
![]() JEE Main 2019 Application Form has been released from 1st September 2018. JEE Main 2019 is conducted by the National Testing Agency (NTA). Through this exam, candidates can get admission into various UG engineering seats offered by all IITs and NITs across the country. In this article, we have compiled the detailed application procedure to facilitate the candidates so that they may come to know that how to apply for JEE Main 2019.
JEE Main 2019 Application Form has been released from 1st September 2018. JEE Main 2019 is conducted by the National Testing Agency (NTA). Through this exam, candidates can get admission into various UG engineering seats offered by all IITs and NITs across the country. In this article, we have compiled the detailed application procedure to facilitate the candidates so that they may come to know that how to apply for JEE Main 2019.
JEE Main 2019 Notification – Registration Started
![]() JEE Main 2019 application form (January 2019 exam) has been released from 1st September 2018. Check here for application form details.
JEE Main 2019 application form (January 2019 exam) has been released from 1st September 2018. Check here for application form details.
JEE Main Online Registration 2019
JEE Main online registration for JEE Main 2019 has been started from 1st September 2018. Candidates are able to fill the application form till 30th September 2018.
Candidates can fill the application through online mode. No hard copy of the application form is entertained.
Aadhaar Card is not compulsory to fill the application form. Candidates also have to book slot for the online mode exam while filling up the application form.
Also Check:
The entire application process has only three steps:
- STEP 1 – Application Form
- STEP 2 – Upload Image
- STEP 3 – Fee Payment
- STEP 4 – Download Confirmation Page
Watch the Complete Video of How to fill JEE Main 2019 Application Form:
If you need more information, then continue reading:
STEP – 1: Fill Application Form
STEP – 1.1: Visit Official Website
- Log on to the official site of JEE Main 2019. (Link is given above)
- Click on the link for apply for JEE Main 2019.

STEP – 1.2: Read Instructions
- Read the instructions carefully.
- Click on the check box and proceed to apply online. [see image below]

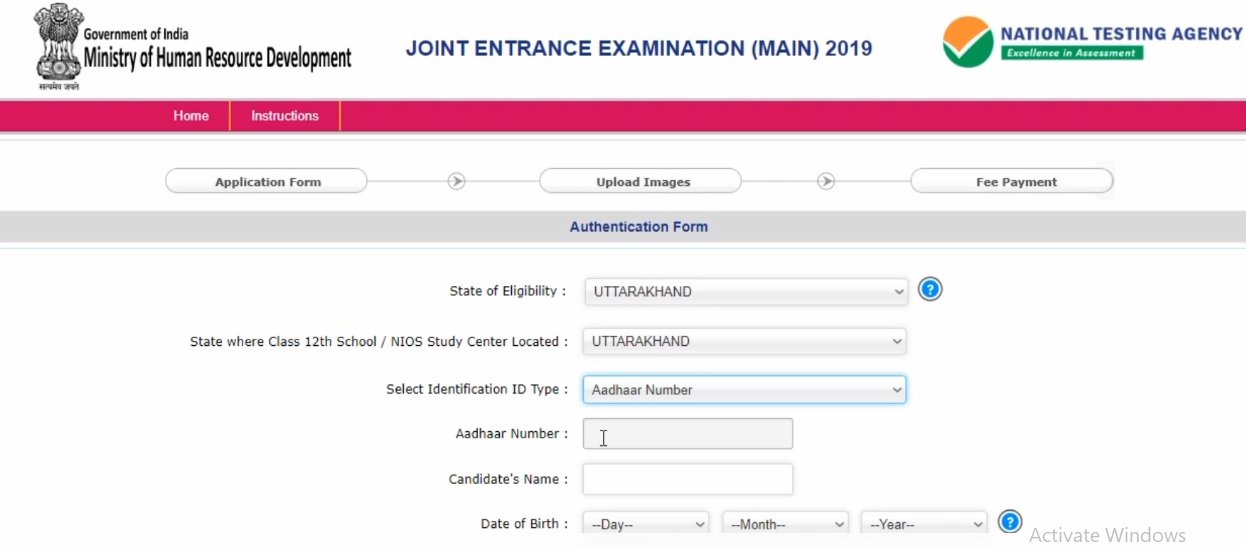
STEP – 1.3: Fill the Authentication Form
- Fill the Nationality, State of Eligibility, State, Identification No. (Any government approved ID), D.O.B, Gender, security pin (case-sensitive) and submit the button. [see image below]
STEP – 1.4: Fill JEE Main Application Details
Exam Related Details: Fill the exam detail like applying for, mode of examination, exam centre and exam medium.
Mailing Address Details: Fill the mailing details including address, mail ID and contact No.

Personal Details: Fill the personal details like name, father/mother name, state of eligibility, category, DOB, nationality, gender and place of residence.

Academic Details: Fill the fields for academic details like year of passing, school board etc.

Guardians Details: Fill the qualification, occupation and annual income of guardians.
Choose Password: create the password, enter security pin and click on the “NEXT” button. [see image below]

STEP – 1.5: Review Page
You will be redirected to this review page.

You may change your details by press the “edit credential” button or may go to the “final submit” button.

STEP – 2: Upload Images
- Click on the button for ‘UPLOAD SCANNED IMAGES‘.
- Upload the photo and signatures one by one.
- Click on the preview button and change if found not OK.
- Make final upload and go to the next step.

STEP – 2.1: Prepare Scanned Images
This step will contain the procedure to upload the images (candidate signature, parents signature & photograph and other required stuff.
Before filling the application form, one needs to collect the class 10th mark-sheet and following information/stuff to complete this step:
Photograph:
- The photograph should be passport size with name and date of taking photograph.
- The photograph should be coloured or b/w with the clear background (prefer white/blue background).
- It should be a scanned image in jpg or jpeg format.
- Spectacles are allowed.
- Polaroid photos are not acceptable.
- The size should be 3.5 x 4.5 cm (width x height).
- File size should be more than 10 kb and less than 100 kb.
- The photograph should be clear (without blur or smudge).
- Name and date of taking photograph should be mentioned.
Signature:
- The signatures (candidate’s and parents) should be done by the candidates only as it may be checked any time frequently.
- Signature will be accepted on the white page only.
- Take the white sheet and mark the box size of 3.5 x 1.5 cm.
- Sign inside the box.
- The scanned image in jpeg/jpg format.
- Crop only box area.
- Save in file size is not less than 4 kb and not more than 30 kb.

STEP – 3: Fee Payment
Here we are discussing that how to remit the application fee:
- Click on the link of ‘Pay Exam Fee’.
- Click on “Go for Payment”.
- Select the mode of payment as via credit/debit card/net banking.
- In case the examination fee is paid through credit/debit cards, select the payment gateway.
- Application fee once paid will not be refunded (full or partial) under any circumstances.

STEP – 4: Download Confirmation Page
- Now, click on “click here to go home”.
- Candidates should secure their user ID, password and application form number for the further communication as it may be entertained until the end of admission procedure.
- Click on print the confirmation page.
- In case the confirmation page is not generated after payment of fee then the transaction is cancelled and the amount will be refunded to the candidate account within a week and however the candidate has to make another transaction till the confirmation Page is not generated.
- After the confirmation of fee deposited from Bank, the candidate will be able to print the Acknowledgment Page, by login to their account again.
- In case the Acknowledgment Page is not generated, the candidate should contact the concerned bank/branch to update his/her transaction.
- Now safely logout the window.
If you have any query about How to Apply for JEE Main 2019, you can ask us by leaving your comments in the comment box.
The post How to Apply for JEE Main 2019, Step by Step Form Filling Procedure appeared first on SarvGyan.

No comments:
Post a Comment